


Hướng dẫn này dành cho native image được điều chỉnh không có thẻ Xposed. Hãy dùng native Xposed activation component để tránh các vấn đề kiểm soát rủi ro do thư viện Xposed mã nguồn mở gây ra.
1. Phạm vi áp dụng
Hướng dẫn này giúp tích hợp việc preload dịch vụ Xposed hoặc các tính năng đi kèm vào native image được FoxPhone hỗ trợ. Các hệ thống Android hiện được hỗ trợ:
- AOSP 10
- AOSP 12
Không đồng thời thêm dependency Xposed Bridge mã nguồn mở khác. AAR này dùng namespace API đã được nền tảng điều chỉnh; trộn thêm thư viện Bridge khác có thể gây xung đột class, lỗi tải hoặc tạo thêm tín hiệu kiểm soát rủi ro.
2. Tải xuống dependency tích hợp
Tải xuống AAR do nền tảng cung cấp và giữ tên tệp là xposed-bridge-debug.aar:
xposed-bridge-debug.aar 264.87 KB
- Kích thước tệp: 271231 bytes (khoảng 264.87 KB)
- SHA-256:
D9DC538315E875D83357B3986CC27D1F7535BE17D9F3F6E69C2F327C9A23FC98 - Android API tối thiểu: 26
3. Tích hợp demo Android
Bước 1: Tạo dự án Android
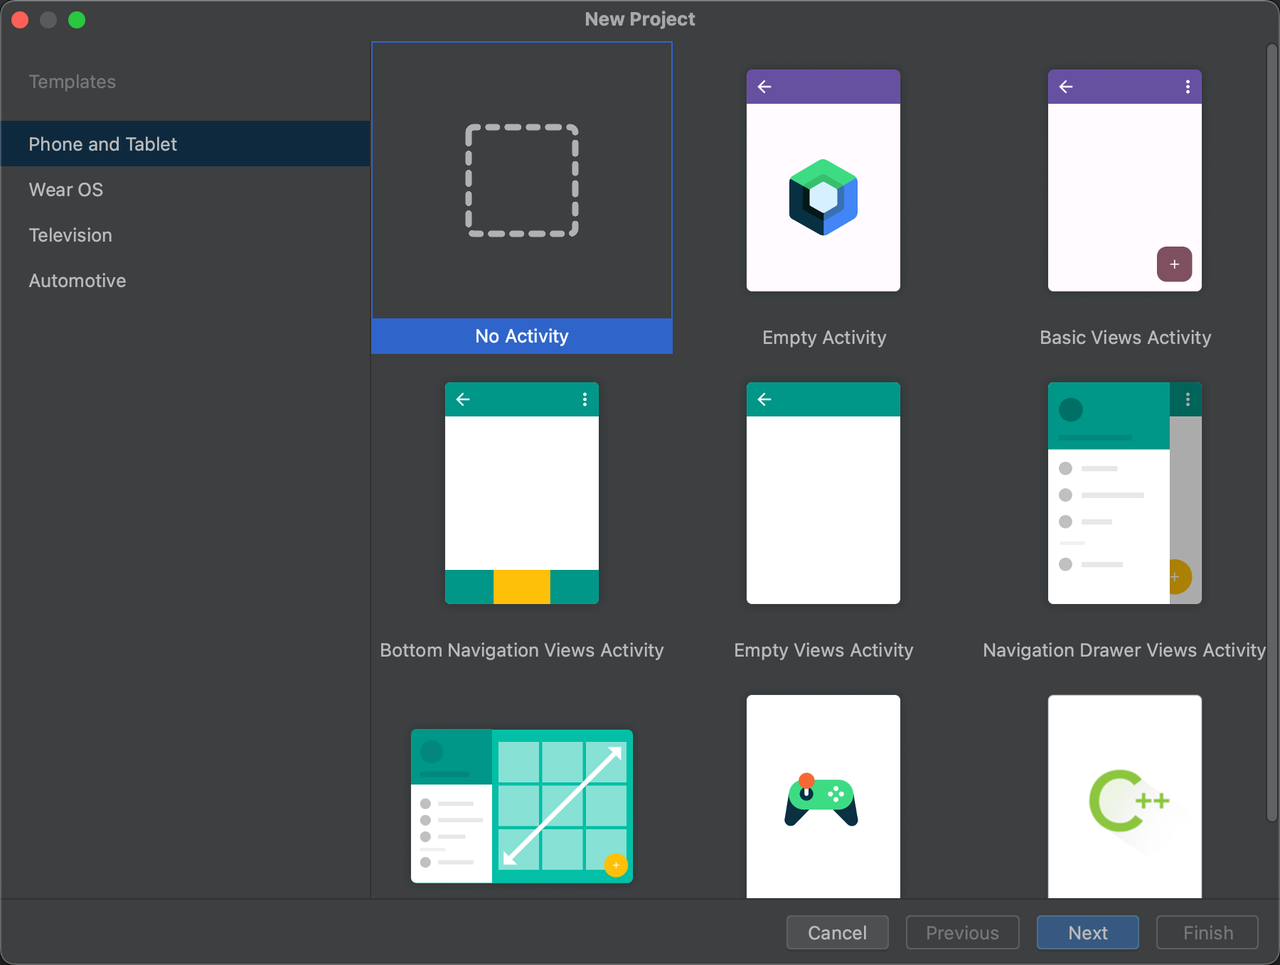
- Tạo một dự án Android trong Android Studio.
- Choose the No Activity template to avoid generating unrelated screen code.
- The example can use Java; when using Kotlin, implement the entry class with the same interfaces.
Bước 2: Thêm AAR
- Create a
libsdirectory under the App module. - Place
xposed-bridge-debug.aarinapp/libs/. - Reference it with
compileOnlyinapp/build.gradle.ktsso the Bridge implementation is not packaged into the APK again.
dependencies {
    compileOnly(files("libs/xposed-bridge-debug.aar"))
}
For projects using the Groovy DSL, configure it in app/build.gradle:
dependencies {
    compileOnly files('libs/xposed-bridge-debug.aar')
}
Bước 3: Cấu hình điểm vào module
- Create an
assetsdirectory underapp/src/main/. - Tạo tệp không có phần mở rộng
xposed_init。 - Nhập tên đầy đủ của một lớp entry trên mỗi dòng. Ví dụ:
com.example.myapplication.MainThe package and class name in xposed_init must exactly match the source code; otherwise the native component cannot find the entry class.
Bước 4: Triển khai lớp entry
The API package in the AAR is de.robv.android.examed, not the de.robv.android.xposed package commonly used by open-source Xposed libraries. Entry class example:
package com.example.myapplication;

import de.robv.android.examed.IXposedHookLoadPackage;
import de.robv.android.examed.XposedBridge;
import de.robv.android.examed.callbacks.XC_LoadPackage;

public class Main implements IXposedHookLoadPackage {
    @Override
    public void handleLoadPackage(XC_LoadPackage.LoadPackageParam loadPackageParam)
            throws Throwable {
        // 必须先限制目标包,避免在所有应用进程中执行初始化逻辑。
        if (!"com.example.target".equals(loadPackageParam.packageName)) {
            return;
        }

        XposedBridge.log("Native Xposed module loaded: "
                + loadPackageParam.packageName);

        // 在此处实现经过授权的服务预启或伴随逻辑。
    }
}
Replace com.example.target with the actual target application package, and keep business logic limited to authorized applications and scenarios.
Bước 5: Kiểm tra cấu trúc dự án
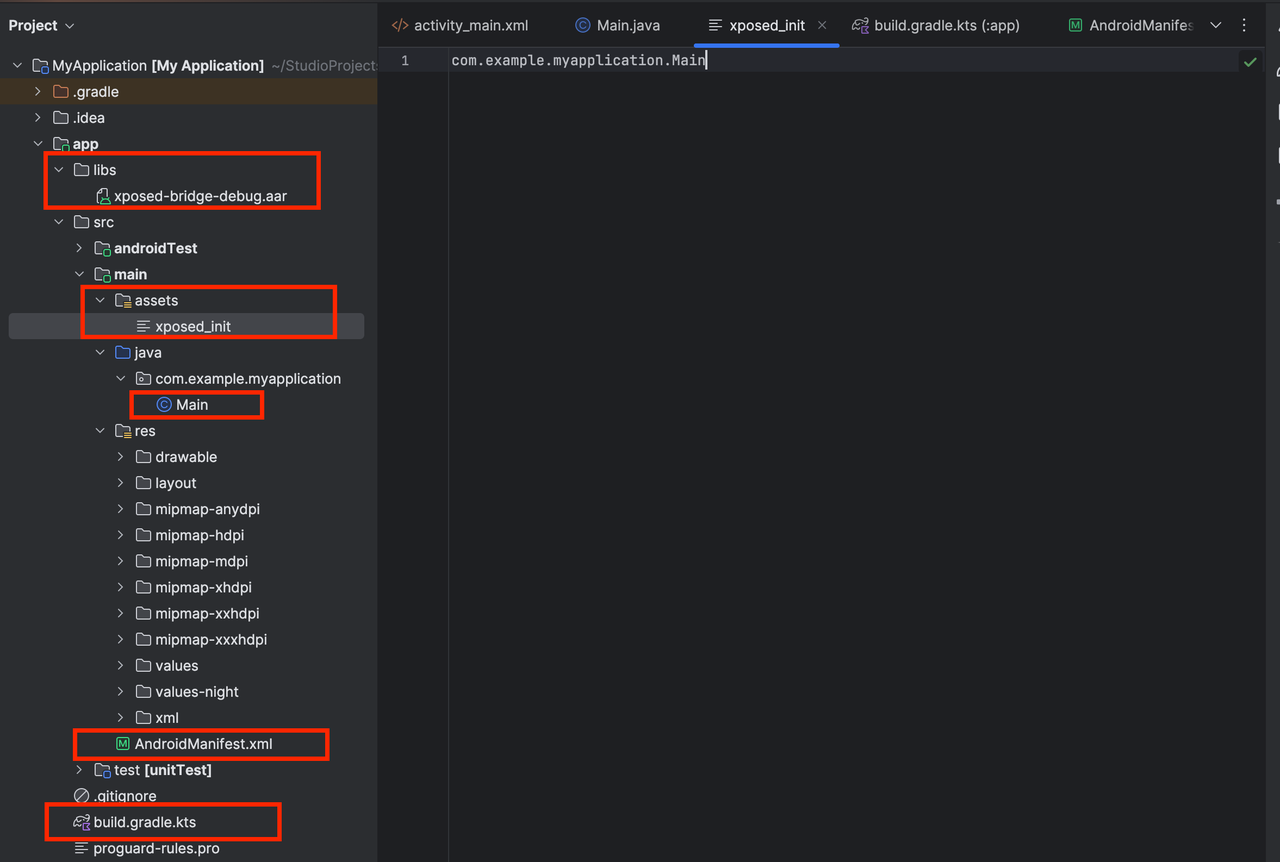
Sau khi cấu hình, dự án phải có ít nhất các tệp sau:
app/libs/xposed-bridge-debug.aarapp/src/main/assets/xposed_initapp/src/main/java/.../Main.javaor the corresponding Kotlin fileapp/src/main/AndroidManifest.xmlapp/build.gradle.ktsorapp/build.gradle
Bước 6: Cấu hình quy tắc làm rối mã
Nếu bản build release bật R8 hoặc ProGuard, hãy giữ lại lớp entry để tên lớp không bị đổi hoặc xóa:
-keep class com.example.myapplication.Main { *; }Nếu đổi package của lớp entry, hãy cập nhật cả xposed_init and the obfuscation rules.。
Bước 7: Build và xác minh
- Chạy Gradle Sync và xác nhận dependency AAR được phân giải chính xác.
- Build the APK and confirm that it contains
assets/xposed_init. - Install the APK on a supported native image instance.
- Enable the module through the FoxPhone native Xposed activation component.
- Launch the target application, check the logs for entry-class output, and verify that the business logic runs only in the target package.
4. Câu hỏi thường gặp
1. Module không chạy sau khi cài đặt
Confirm that the instance uses a supported AOSP 10 or AOSP 12 native image, that the module is activated by the native component, and that the fully qualified class name in xposed_init is correct.
2. Không tìm thấy interface Xposed khi biên dịch
Check that the AAR is in app/libs/, verify the path in the Gradle file, and confirm that the de.robv.android.examed namespace is imported.
3. Gói Release cài đặt bình thường nhưng entry không chạy
Check whether R8 or ProGuard changed or removed the entry class, and verify that the obfuscation rules match xposed_init.
4. Xuất hiện class trùng hoặc xung đột Bridge khi chạy
Remove other Xposed Bridge dependencies and confirm that the platform AAR is added with compileOnly and is not packaged into the APK twice.
5. Module ảnh hưởng đến ứng dụng không phải mục tiêu
Filter by packageName at the very start of the entry method and return immediately for non-target processes.


