


Diese Anleitung gilt für native Images ohne Xposed-Tag. Sie verwendet die native Xposed-Aktivierungskomponente, um mögliche Risiko- und Kompatibilitätsprobleme offener Xposed-Bibliotheken zu vermeiden.
1. Geltungsbereich
Diese Anleitung beschreibt die Integration des Xposed-Service-Preloads oder von Begleitfunktionen in von FoxPhone unterstützten nativen Images. Derzeit werden folgende Android-Systeme unterstützt:
- AOSP 10
- AOSP 12
Binden Sie nicht gleichzeitig eine weitere Open-Source-Xposed-Bridge-Abhängigkeit ein. Das bereitgestellte AAR verwendet den angepassten API-Namespace der Plattform; eine weitere Bridge-Bibliothek kann Klassenkonflikte, Ladefehler oder zusätzliche Risiko-Signale verursachen.
2. Integrationsabhängigkeit herunterladen
Laden Sie das von der Plattform bereitgestellte AAR herunter und behalten Sie den Dateinamen xposed-bridge-debug.aar:
xposed-bridge-debug.aar 264.87 KB
- Dateigröße: 271231 Bytes (ca. 264,87 KB)
- SHA-256:
D9DC538315E875D83357B3986CC27D1F7535BE17D9F3F6E69C2F327C9A23FC98 - Minimale Android-API: 26
3. Android-Demo-Integration
Schritt 1: Android-Projekt erstellen
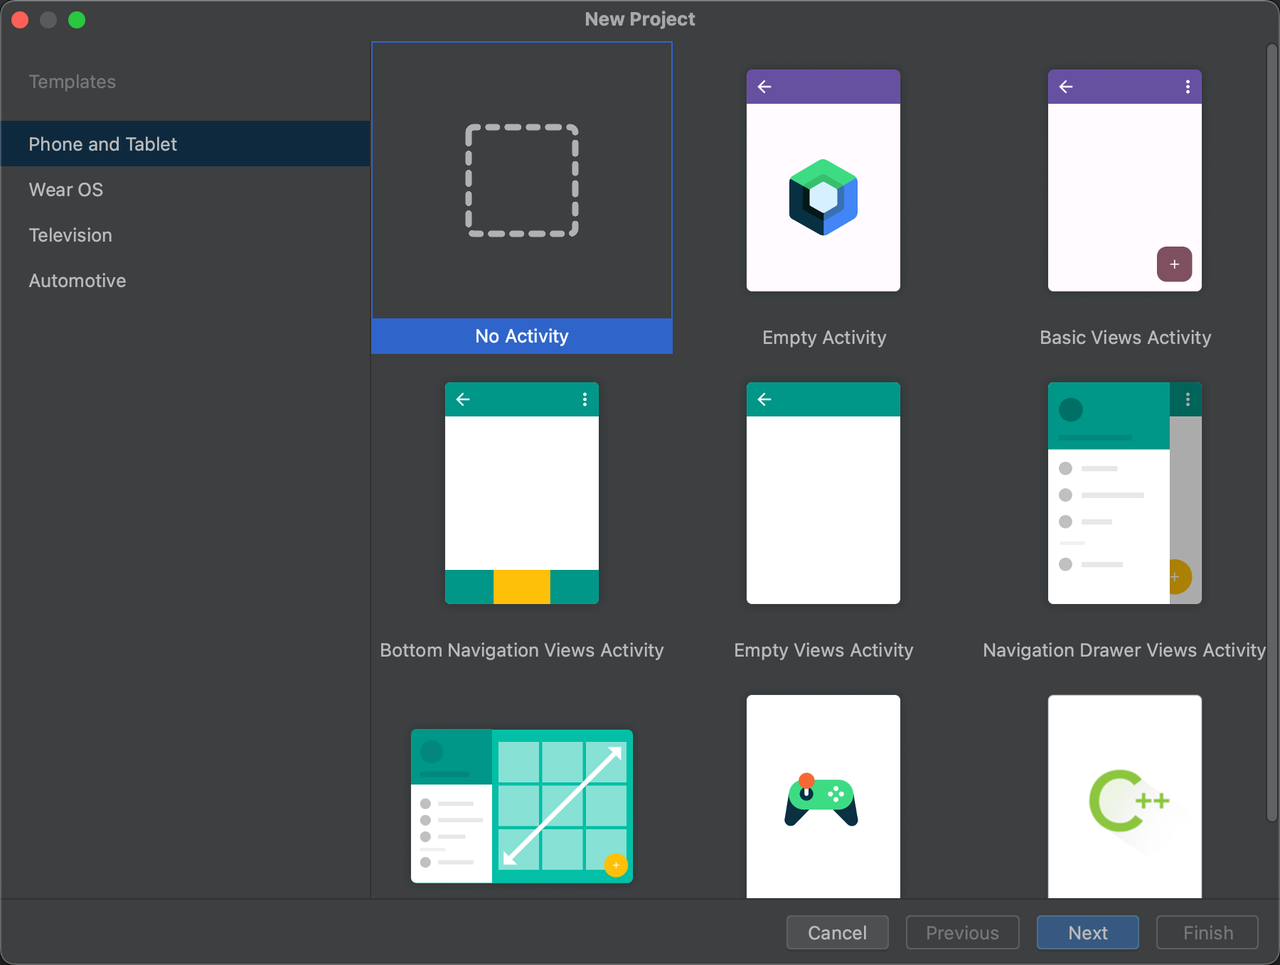
- Erstellen Sie in Android Studio ein Android-Projekt.
- Choose the No Activity template to avoid generating unrelated screen code.
- The example can use Java; when using Kotlin, implement the entry class with the same interfaces.
Schritt 2: AAR einbinden
- Create a
libsdirectory under the App module. - Place
xposed-bridge-debug.aarinapp/libs/. - Reference it with
compileOnlyinapp/build.gradle.ktsso the Bridge implementation is not packaged into the APK again.
dependencies {
    compileOnly(files("libs/xposed-bridge-debug.aar"))
}
For projects using the Groovy DSL, configure it in app/build.gradle:
dependencies {
    compileOnly files('libs/xposed-bridge-debug.aar')
}
Schritt 3: Moduleinstieg konfigurieren
- Create an
assetsdirectory underapp/src/main/. - Erstellen Sie die Datei ohne Erweiterung
xposed_init。 - Tragen Sie pro Zeile den vollständig qualifizierten Namen einer Einstiegsklasse ein. Beispiel:
com.example.myapplication.MainThe package and class name in xposed_init must exactly match the source code; otherwise the native component cannot find the entry class.
Schritt 4: Einstiegsklasse implementieren
The API package in the AAR is de.robv.android.examed, not the de.robv.android.xposed package commonly used by open-source Xposed libraries. Entry class example:
package com.example.myapplication;

import de.robv.android.examed.IXposedHookLoadPackage;
import de.robv.android.examed.XposedBridge;
import de.robv.android.examed.callbacks.XC_LoadPackage;

public class Main implements IXposedHookLoadPackage {
    @Override
    public void handleLoadPackage(XC_LoadPackage.LoadPackageParam loadPackageParam)
            throws Throwable {
        // 必须先限制目标包,避免在所有应用进程中执行初始化逻辑。
        if (!"com.example.target".equals(loadPackageParam.packageName)) {
            return;
        }

        XposedBridge.log("Native Xposed module loaded: "
                + loadPackageParam.packageName);

        // 在此处实现经过授权的服务预启或伴随逻辑。
    }
}
Replace com.example.target with the actual target application package, and keep business logic limited to authorized applications and scenarios.
Schritt 5: Projektstruktur prüfen
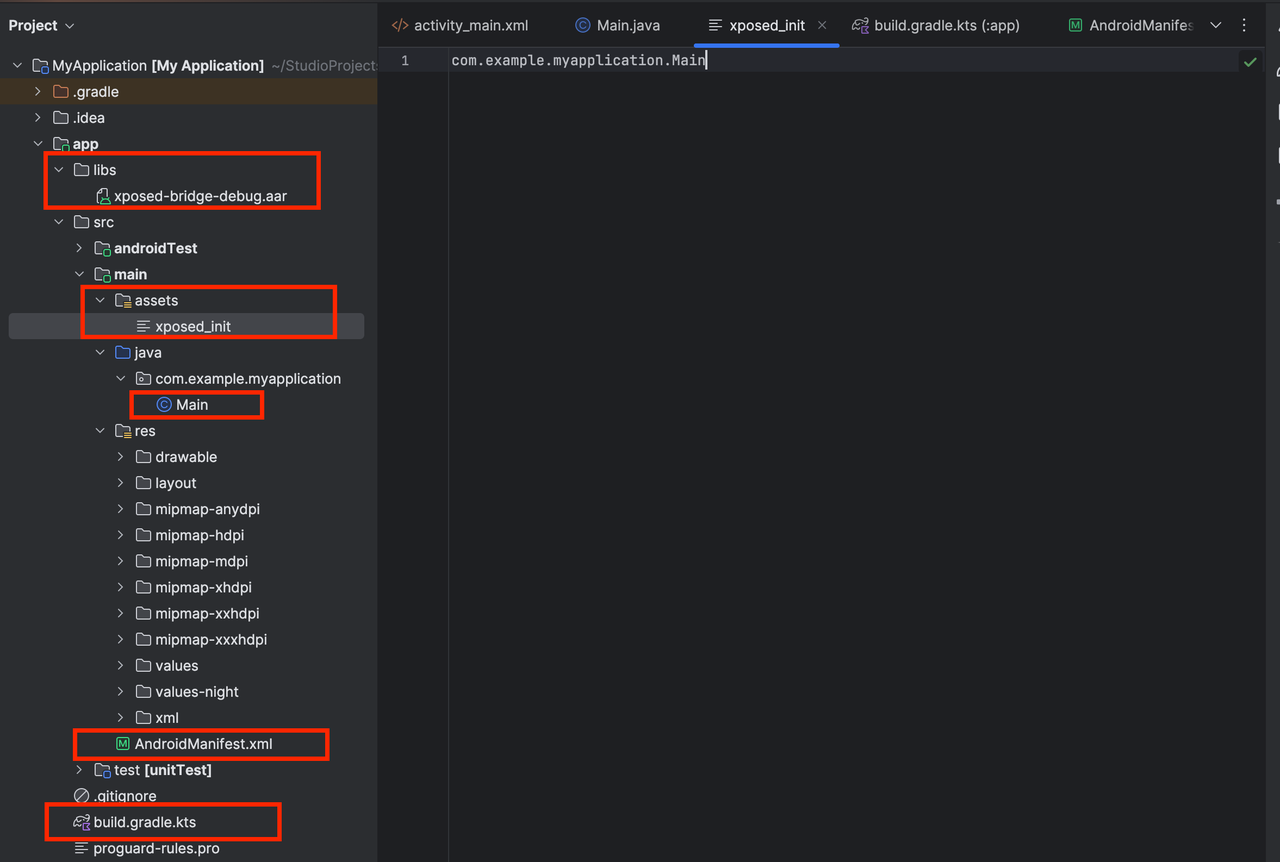
Nach der Konfiguration sollte das Projekt mindestens die folgenden Dateien enthalten:
app/libs/xposed-bridge-debug.aarapp/src/main/assets/xposed_initapp/src/main/java/.../Main.javaor the corresponding Kotlin fileapp/src/main/AndroidManifest.xmlapp/build.gradle.ktsorapp/build.gradle
Schritt 6: Obfuskierungsregeln konfigurieren
Wenn der Release-Build R8 oder ProGuard aktiviert, muss die Einstiegsklasse erhalten bleiben, damit ihr Name nicht geändert oder entfernt wird:
-keep class com.example.myapplication.Main { *; }Wenn Sie das Paket der Einstiegsklasse ändern, aktualisieren Sie auch xposed_init and the obfuscation rules.。
Schritt 7: Erstellen und prüfen
- Führen Sie Gradle Sync aus und prüfen Sie, ob die AAR-Abhängigkeit korrekt aufgelöst wird.
- Build the APK and confirm that it contains
assets/xposed_init. - Install the APK on a supported native image instance.
- Enable the module through the FoxPhone native Xposed activation component.
- Launch the target application, check the logs for entry-class output, and verify that the business logic runs only in the target package.
4. Häufig gestellte Fragen
1. Das Modul läuft nach der Installation nicht
Confirm that the instance uses a supported AOSP 10 or AOSP 12 native image, that the module is activated by the native component, and that the fully qualified class name in xposed_init is correct.
2. Xposed-Schnittstellen werden beim Kompilieren nicht gefunden
Check that the AAR is in app/libs/, verify the path in the Gradle file, and confirm that the de.robv.android.examed namespace is imported.
3. Das Release-Paket wird installiert, aber der Einstieg wird nicht ausgeführt
Check whether R8 or ProGuard changed or removed the entry class, and verify that the obfuscation rules match xposed_init.
4. Zur Laufzeit treten doppelte Klassen oder ein Bridge-Konflikt auf
Remove other Xposed Bridge dependencies and confirm that the platform AAR is added with compileOnly and is not packaged into the APK twice.
5. Das Modul beeinflusst eine Nicht-Zielanwendung
Filter by packageName at the very start of the entry method and return immediately for non-target processes.


