


このガイドは Xposed タグを付けずに適合させたネイティブイメージを対象とします。オープンソースの Xposed ライブラリによるリスク制御上の問題を避けるため、ネイティブ Xposed アクティベーションコンポーネントを使用します。
1. 対象範囲
FoxPhone がサポートするネイティブイメージに、Xposed サービスの事前起動または付随機能を統合するためのガイドです。現在サポートされている Android システム:
- AOSP 10
- AOSP 12
他のオープンソース Xposed Bridge 依存関係を同時に追加しないでください。この AAR はプラットフォームに適合した API 名前空間を使用しており、別の Bridge ライブラリを混在させるとクラス競合、読み込み失敗、追加のリスク制御シグナルが発生する可能性があります。
2. 統合用依存関係をダウンロード
プラットフォームが提供する AAR をダウンロードし、ファイル名を次のままにします xposed-bridge-debug.aar:
xposed-bridge-debug.aar 264.87 KB
- ファイルサイズ: 271231 bytes(約 264.87 KB)
- SHA-256:
D9DC538315E875D83357B3986CC27D1F7535BE17D9F3F6E69C2F327C9A23FC98 - 最小 Android API: 26
3. Android デモ統合
手順1: Android プロジェクトを作成
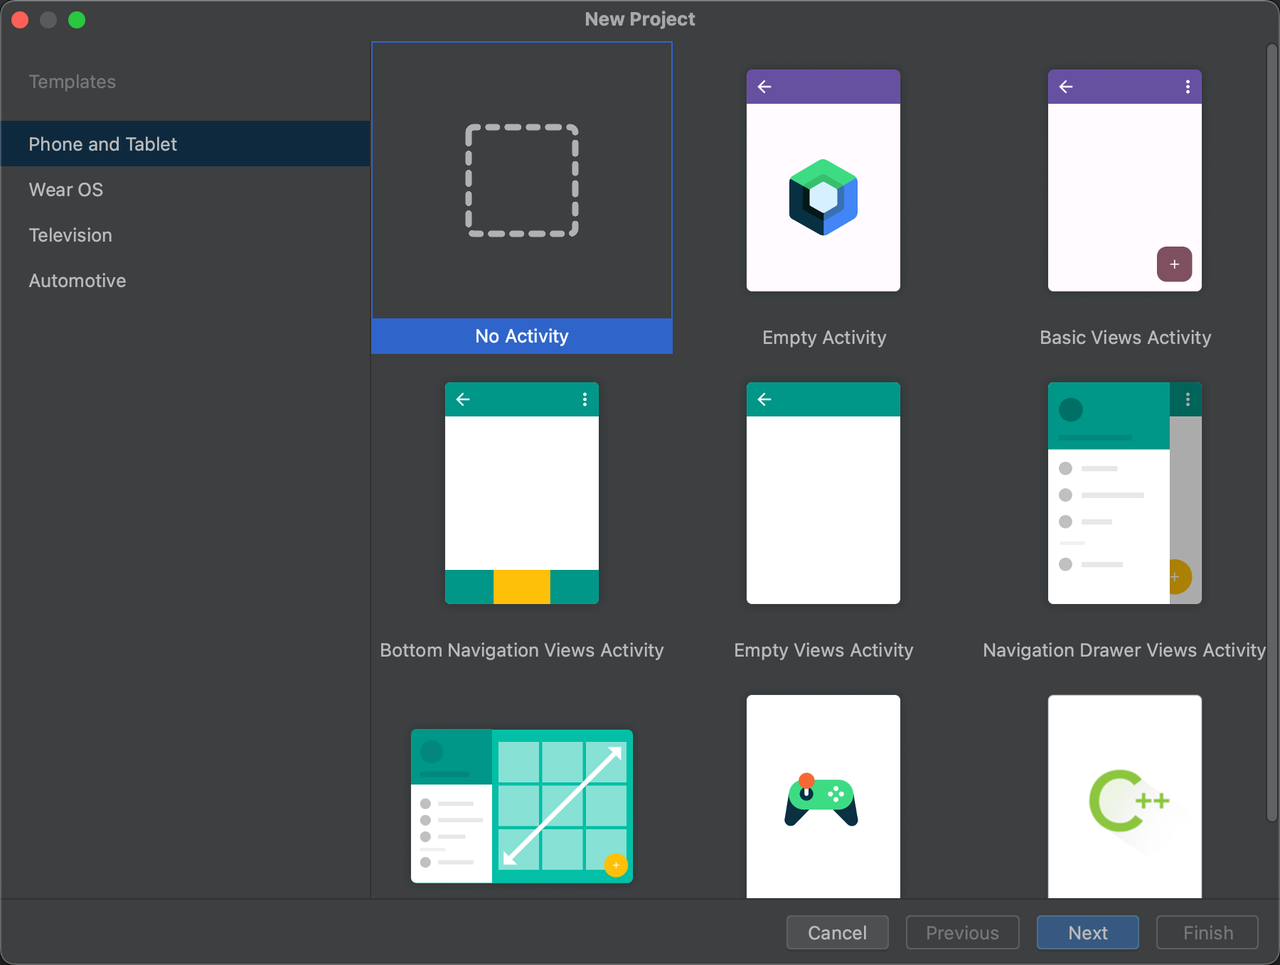
- Android Studio で Android プロジェクトを作成します。
- Choose the No Activity template to avoid generating unrelated screen code.
- The example can use Java; when using Kotlin, implement the entry class with the same interfaces.
手順2: AAR を追加
- Create a
libsdirectory under the App module. - Place
xposed-bridge-debug.aarinapp/libs/. - Reference it with
compileOnlyinapp/build.gradle.ktsso the Bridge implementation is not packaged into the APK again.
dependencies {
    compileOnly(files("libs/xposed-bridge-debug.aar"))
}
For projects using the Groovy DSL, configure it in app/build.gradle:
dependencies {
    compileOnly files('libs/xposed-bridge-debug.aar')
}
手順3: モジュールのエントリポイントを設定
- Create an
assetsdirectory underapp/src/main/. - 拡張子のないファイルを作成します
xposed_init。 - 各行に 1 つのエントリクラスの完全修飾名を記入します。例:
com.example.myapplication.MainThe package and class name in xposed_init must exactly match the source code; otherwise the native component cannot find the entry class.
手順4: エントリクラスを実装
The API package in the AAR is de.robv.android.examed, not the de.robv.android.xposed package commonly used by open-source Xposed libraries. Entry class example:
package com.example.myapplication;

import de.robv.android.examed.IXposedHookLoadPackage;
import de.robv.android.examed.XposedBridge;
import de.robv.android.examed.callbacks.XC_LoadPackage;

public class Main implements IXposedHookLoadPackage {
    @Override
    public void handleLoadPackage(XC_LoadPackage.LoadPackageParam loadPackageParam)
            throws Throwable {
        // 必须先限制目标包,避免在所有应用进程中执行初始化逻辑。
        if (!"com.example.target".equals(loadPackageParam.packageName)) {
            return;
        }

        XposedBridge.log("Native Xposed module loaded: "
                + loadPackageParam.packageName);

        // 在此处实现经过授权的服务预启或伴随逻辑。
    }
}
Replace com.example.target with the actual target application package, and keep business logic limited to authorized applications and scenarios.
手順5: プロジェクト構成を確認
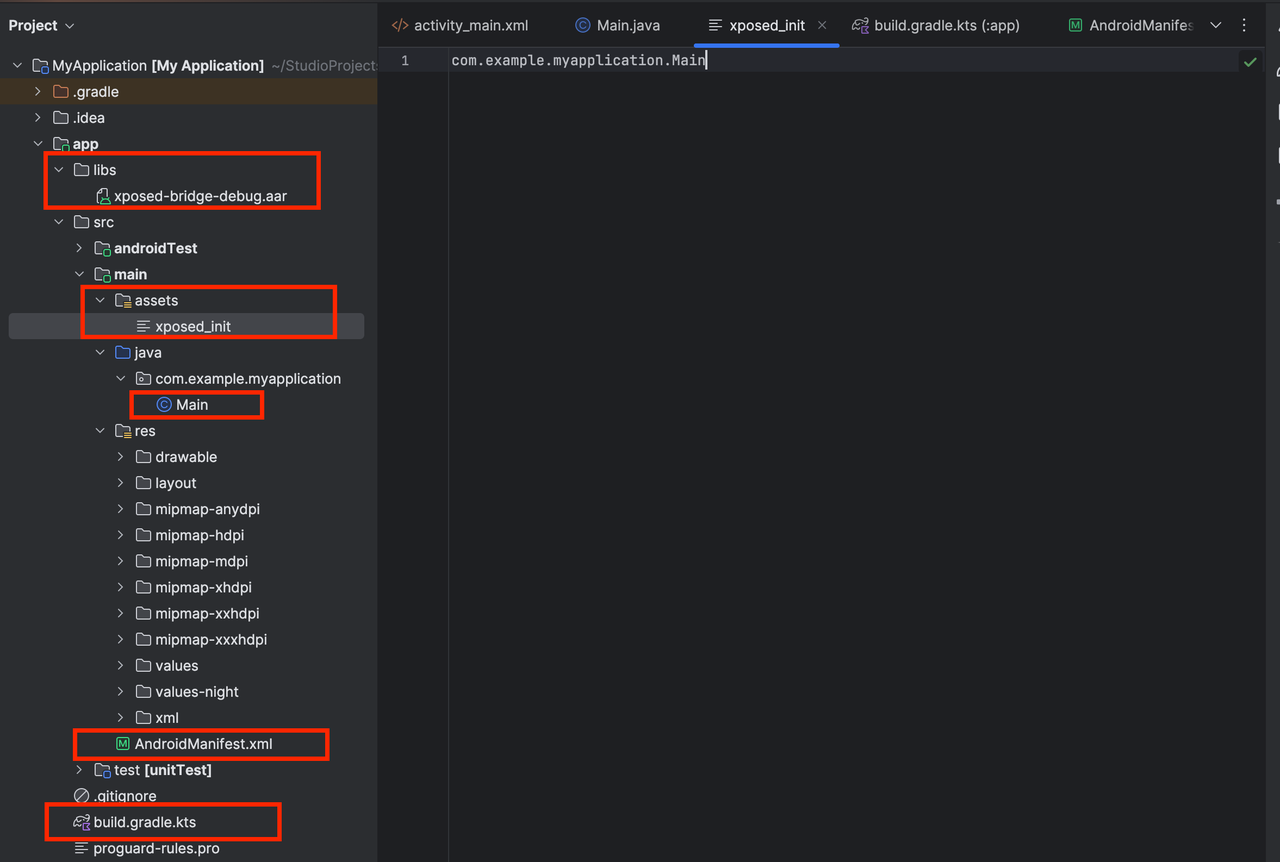
設定後、プロジェクトには少なくとも次のファイルが含まれている必要があります:
app/libs/xposed-bridge-debug.aarapp/src/main/assets/xposed_initapp/src/main/java/.../Main.javaor the corresponding Kotlin fileapp/src/main/AndroidManifest.xmlapp/build.gradle.ktsorapp/build.gradle
手順6: 難読化ルールを設定
リリースビルドで R8 または ProGuard を有効にする場合は、エントリクラスが変更・削除されないよう保持します:
-keep class com.example.myapplication.Main { *; }エントリクラスのパッケージ名を変更した場合は、次も更新します xposed_init and the obfuscation rules.。
手順7: ビルドと検証
- Gradle Sync を実行し、AAR 依存関係が正常に解決されることを確認します。
- Build the APK and confirm that it contains
assets/xposed_init. - Install the APK on a supported native image instance.
- Enable the module through the FoxPhone native Xposed activation component.
- Launch the target application, check the logs for entry-class output, and verify that the business logic runs only in the target package.
4. よくある質問
1. モジュールをインストールしても実行されない
Confirm that the instance uses a supported AOSP 10 or AOSP 12 native image, that the module is activated by the native component, and that the fully qualified class name in xposed_init is correct.
2. コンパイル時に Xposed インターフェースが見つからない
Check that the AAR is in app/libs/, verify the path in the Gradle file, and confirm that the de.robv.android.examed namespace is imported.
3. Release パッケージは正常にインストールされるが、エントリが実行されない
Check whether R8 or ProGuard changed or removed the entry class, and verify that the obfuscation rules match xposed_init.
4. 実行時に重複クラスまたは Bridge の競合が発生する
Remove other Xposed Bridge dependencies and confirm that the platform AAR is added with compileOnly and is not packaged into the APK twice.
5. モジュールが対象外アプリに影響する
Filter by packageName at the very start of the entry method and return immediately for non-target processes.


