


이 가이드는 Xposed 태그 없이 적용된 네이티브 이미지를 대상으로 합니다. 오픈 소스 Xposed 라이브러리로 인한 위험 제어 문제를 피하기 위해 네이티브 Xposed 활성화 컴포넌트를 사용합니다.
1. 적용 범위
이 가이드는 FoxPhone이 지원하는 네이티브 이미지에 Xposed 서비스 사전 실행 또는 보조 기능을 통합하는 방법을 설명합니다. 현재 지원되는 Android 시스템:
- AOSP 10
- AOSP 12
다른 오픈 소스 Xposed Bridge 종속성을 동시에 추가하지 마세요. 이 AAR은 플랫폼에 맞게 적용된 API 네임스페이스를 사용하며, 다른 Bridge 라이브러리를 함께 사용하면 클래스 충돌, 로드 실패 또는 추가 위험 제어 신호가 발생할 수 있습니다.
2. 통합 종속성 다운로드
플랫폼에서 제공하는 AAR을 다운로드하고 파일 이름을 다음과 같이 유지하세요 xposed-bridge-debug.aar:
xposed-bridge-debug.aar 264.87 KB
- 파일 크기: 271231 bytes (약 264.87 KB)
- SHA-256:
D9DC538315E875D83357B3986CC27D1F7535BE17D9F3F6E69C2F327C9A23FC98 - 최소 Android API: 26
3. Android 데모 통합
1단계: Android 프로젝트 만들기
- Android Studio에서 Android 프로젝트를 만드세요.
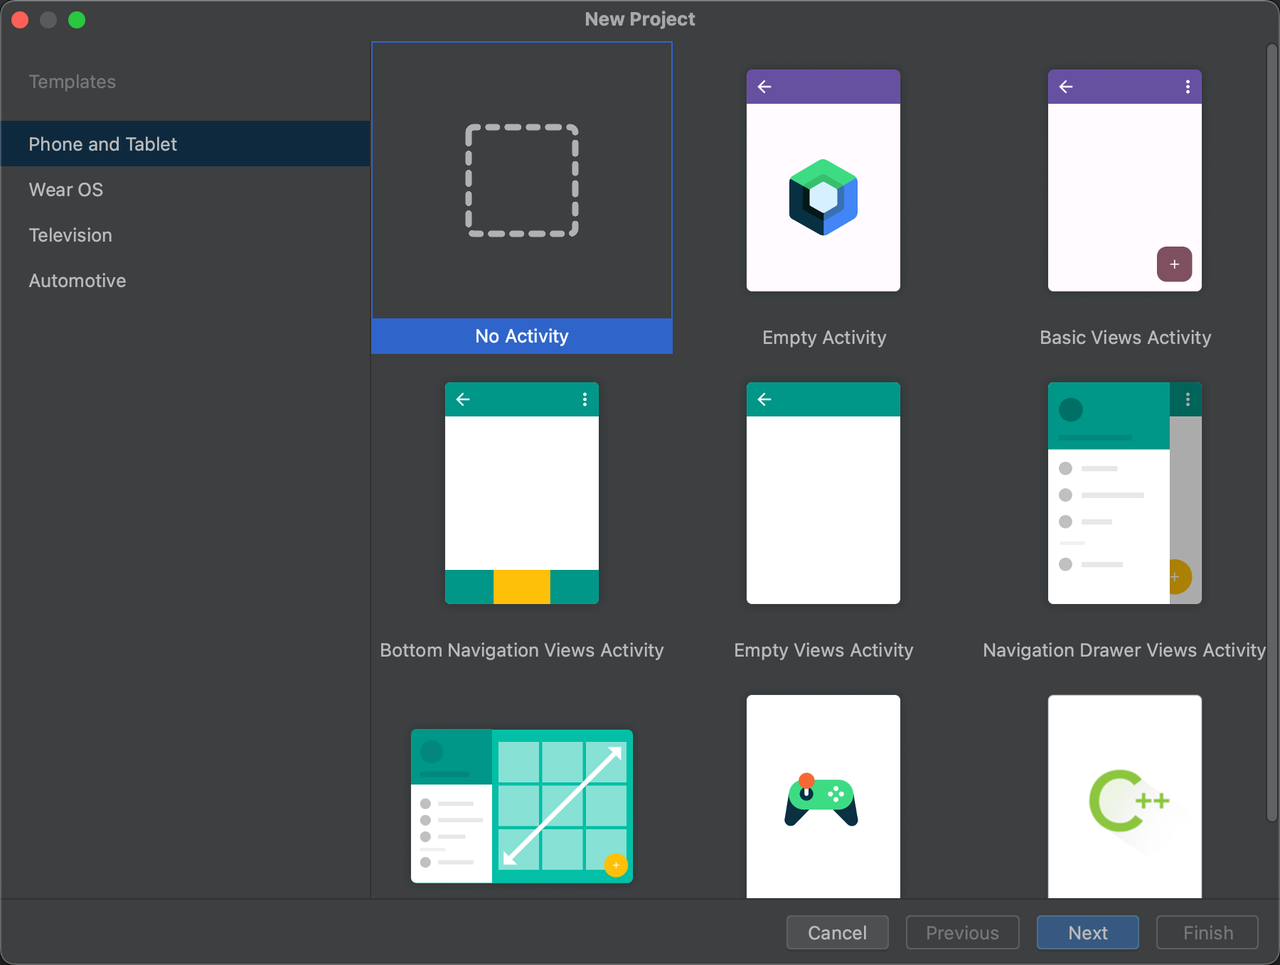
- Choose the No Activity template to avoid generating unrelated screen code.
- The example can use Java; when using Kotlin, implement the entry class with the same interfaces.
2단계: AAR 추가
- Create a
libsdirectory under the App module. - Place
xposed-bridge-debug.aarinapp/libs/. - Reference it with
compileOnlyinapp/build.gradle.ktsso the Bridge implementation is not packaged into the APK again.
dependencies {
    compileOnly(files("libs/xposed-bridge-debug.aar"))
}
For projects using the Groovy DSL, configure it in app/build.gradle:
dependencies {
    compileOnly files('libs/xposed-bridge-debug.aar')
}
3단계: 모듈 진입점 구성
- Create an
assetsdirectory underapp/src/main/. - 확장자가 없는 파일을 만드세요
xposed_init。 - 각 줄에 하나의 진입 클래스 전체 이름을 입력하세요. 예:
com.example.myapplication.MainThe package and class name in xposed_init must exactly match the source code; otherwise the native component cannot find the entry class.
4단계: 진입 클래스 구현
The API package in the AAR is de.robv.android.examed, not the de.robv.android.xposed package commonly used by open-source Xposed libraries. Entry class example:
package com.example.myapplication;

import de.robv.android.examed.IXposedHookLoadPackage;
import de.robv.android.examed.XposedBridge;
import de.robv.android.examed.callbacks.XC_LoadPackage;

public class Main implements IXposedHookLoadPackage {
    @Override
    public void handleLoadPackage(XC_LoadPackage.LoadPackageParam loadPackageParam)
            throws Throwable {
        // 必须先限制目标包,避免在所有应用进程中执行初始化逻辑。
        if (!"com.example.target".equals(loadPackageParam.packageName)) {
            return;
        }

        XposedBridge.log("Native Xposed module loaded: "
                + loadPackageParam.packageName);

        // 在此处实现经过授权的服务预启或伴随逻辑。
    }
}
Replace com.example.target with the actual target application package, and keep business logic limited to authorized applications and scenarios.
5단계: 프로젝트 구조 확인
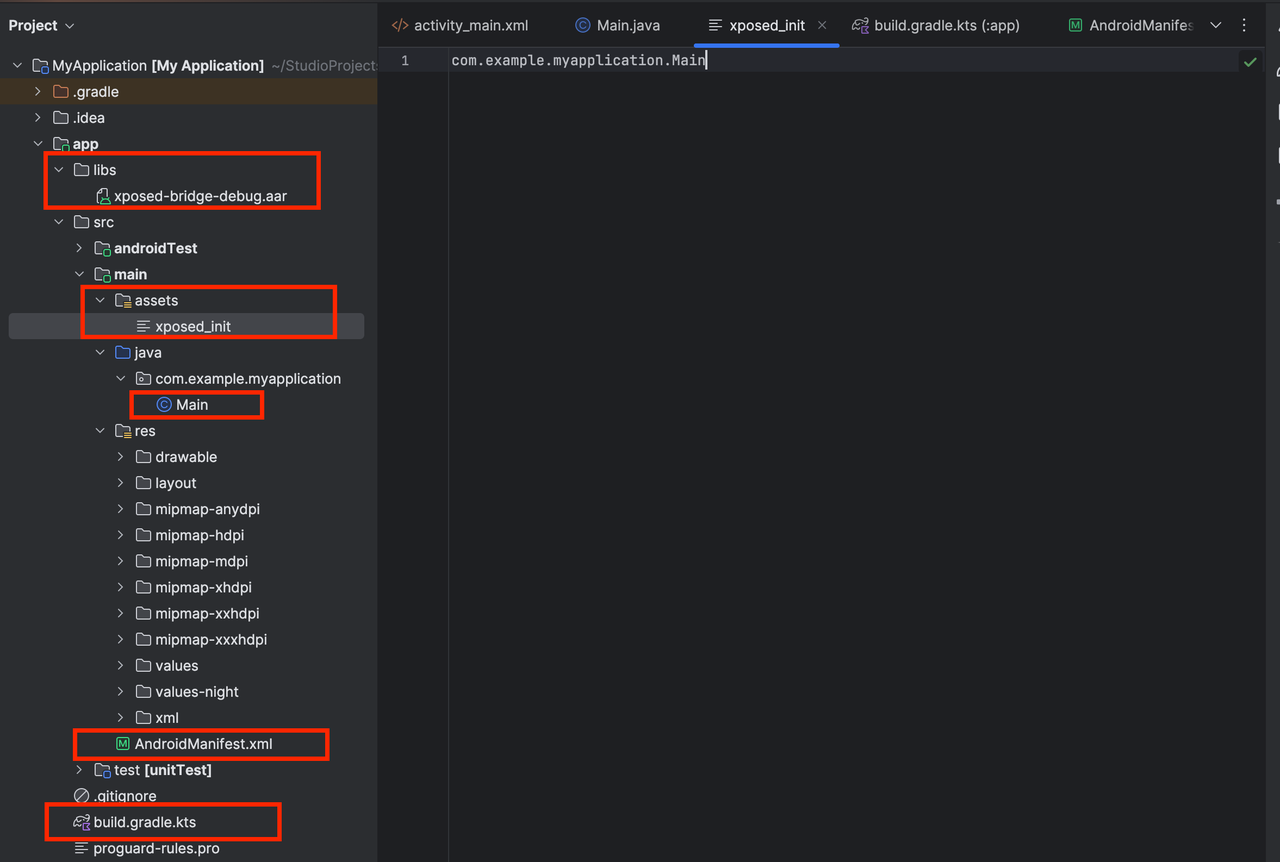
구성이 완료되면 프로젝트에 최소한 다음 파일이 포함되어야 합니다:
app/libs/xposed-bridge-debug.aarapp/src/main/assets/xposed_initapp/src/main/java/.../Main.javaor the corresponding Kotlin fileapp/src/main/AndroidManifest.xmlapp/build.gradle.ktsorapp/build.gradle
6단계: 난독화 규칙 구성
릴리스 빌드에서 R8 또는 ProGuard를 활성화한 경우 진입 클래스가 변경되거나 삭제되지 않도록 유지하세요:
-keep class com.example.myapplication.Main { *; }진입 클래스의 패키지 이름을 변경하면 다음도 함께 수정하세요 xposed_init and the obfuscation rules.。
7단계: 빌드 및 검증
- Gradle Sync를 실행하고 AAR 종속성이 정상적으로 확인되는지 확인하세요.
- Build the APK and confirm that it contains
assets/xposed_init. - Install the APK on a supported native image instance.
- Enable the module through the FoxPhone native Xposed activation component.
- Launch the target application, check the logs for entry-class output, and verify that the business logic runs only in the target package.
4. 자주 묻는 질문
1. 모듈 설치 후 실행되지 않음
Confirm that the instance uses a supported AOSP 10 or AOSP 12 native image, that the module is activated by the native component, and that the fully qualified class name in xposed_init is correct.
2. 컴파일 시 Xposed 인터페이스를 찾을 수 없음
Check that the AAR is in app/libs/, verify the path in the Gradle file, and confirm that the de.robv.android.examed namespace is imported.
3. Release 패키지는 설치되지만 진입점이 실행되지 않음
Check whether R8 or ProGuard changed or removed the entry class, and verify that the obfuscation rules match xposed_init.
4. 런타임에 중복 클래스 또는 Bridge 충돌 발생
Remove other Xposed Bridge dependencies and confirm that the platform AAR is added with compileOnly and is not packaged into the APK twice.
5. 모듈이 대상이 아닌 앱에 영향을 줌
Filter by packageName at the very start of the entry method and return immediately for non-target processes.


